How to Sketch an Avocado

Feeling creative today?
Then grab an avocado, your sketchbook, and let’s get painting together!
I’ll guide you step by step to capture this wonderful fruit in watercolor – no pressure, just joy and flow, and absolutely no need for perfection.
With its velvety texture, shiny seed, and soft green hues, the avocado is a beautiful subject to practice sketching and painting
No prior experience needed – just a willingness to experiment and be present in the moment.
List of materials - What you´ll need

Avocado (slightly unripe works best)
Lemon juice (to keep the fresh green color on the cut surface)
Sharp knife
Watercolor paper or watercolor sketchbook (e.g., Clairefontaine Fontaine Aquarellskizzenbuch)
Brush (e.g., Dartana Spin size 7 by da Vinci)
Pencil (HB or 2B)
Eraser
2 water jars - one for rinsing your brush, one with fresh clean water
Painting rag or old cloth
Ceramic palette or a simple plate
Optional: Fineliner or colored pencils for details
Watercolors
Schmincke Horadam
209 Transparent Yellow
530 Sap Green
342 Vermilion Light
656 Yellow Raw Ochre
667 Raw Umber
653 Transparent Sienna
Sennelier
559 Aureoline
Winsor & Newton
470 Perylene Violet
460 Perylene Green
💡 Tip: You don’t need to buy expensive paints right away. Especially if you're just starting out, budget-friendly sets like Schmincke Akademie are perfect to begin with.
What truly matters is that you get started and have fun!
No avocado at hand but still want to jump in?
Download the reference photo here:
Made handy for you: Full list of materials!
Download here:
Preparation
Take a moment to prepare your creative space.
Find a quiet, well-lit spot – maybe at your dining table or outside on the terrace.
Lay out all your materials so everything is within reach – it helps make your painting time feel calm and easy.
Carefully cut the avocado around the stem with a sharp knife to get a clean cut.
Twist the halves apart – ideally, one half will have the seed, and one won’t. For this sketch, we’ll use the half with the seed.
Dab a bit of lemon juice onto the cut surfaces to keep the green vibrant while you paint.
Let´s sketch!
Step 1: Draw the outline
Using a light pencil, sketch the outline of your avocado half onto the paper.
Add the seed if you’re painting that half.
No need for perfection – mistakes can be erased, and most importantly, this is about enjoying the process!
There’s no “right” or “wrong” here.
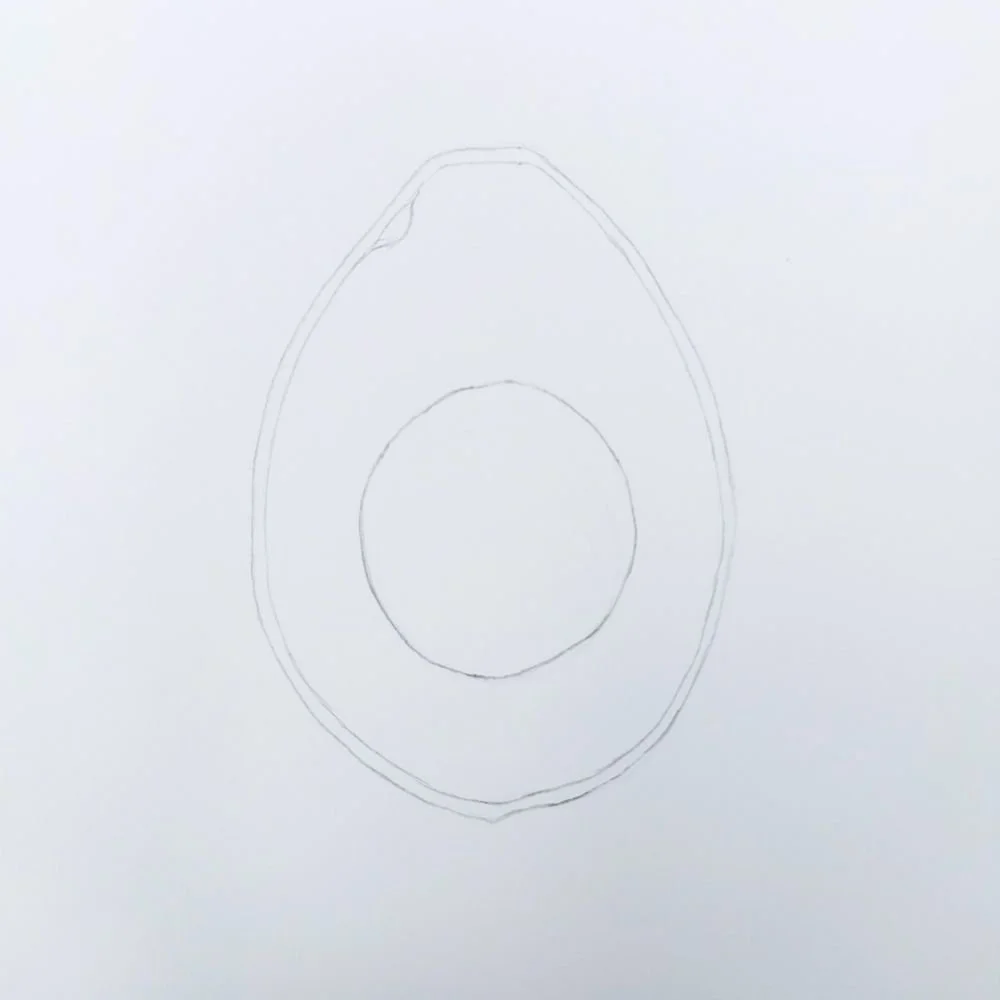
Pencil sketch of Avocado
Step 2: Adding the first layers of color
Mix a creamy yellow for the inner flesh and a green for the outer flesh.
Here are the mixes I used:
Creamy yellow: Sennelier Aureoline + Yellow Raw Ochre + Transparent Yellow
Rich green: Sap Green + Vermilion Light
We don’t need much of the yellow mix. If it looks too dark, just add more water.
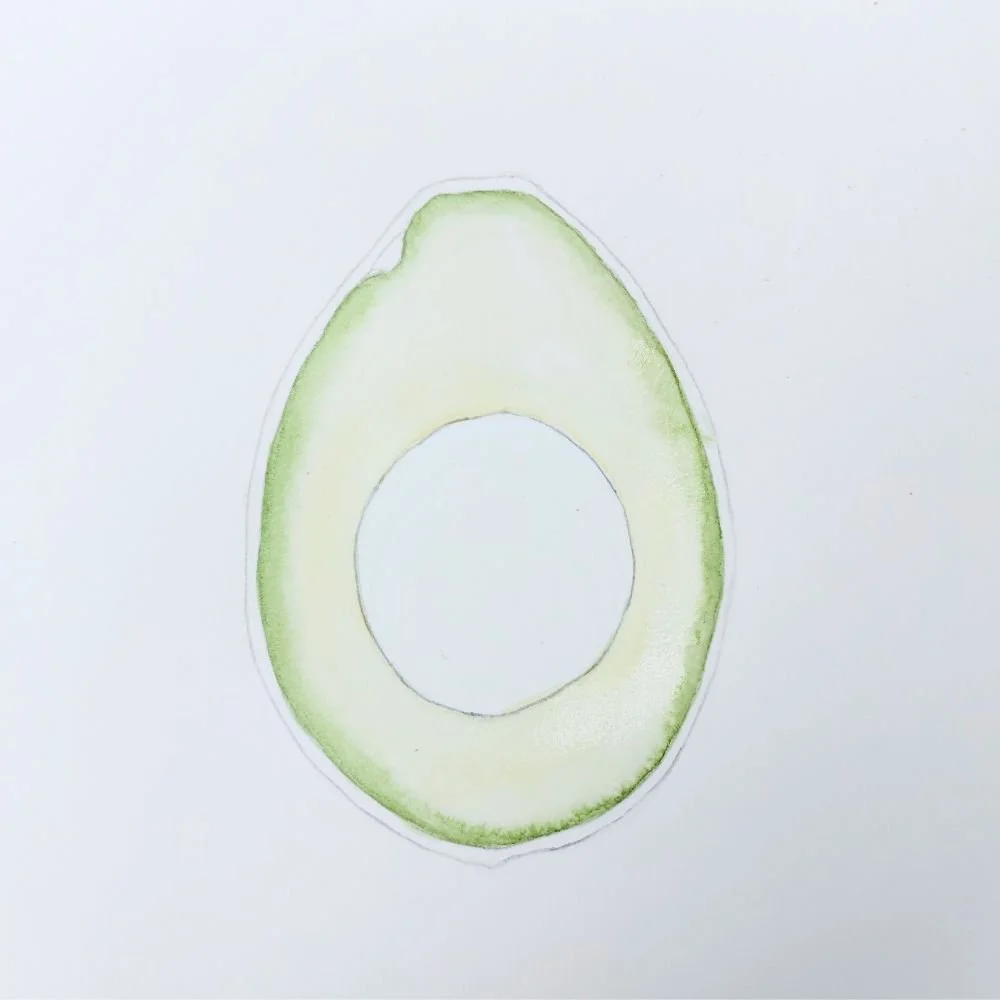
Avocado - First layer
Now, with a clean brush, dampen the area that represents the avocado flesh. Then apply the yellow color smoothly and evenly.
While the area is still wet, you can go ahead and apply the darker green along the edges.
If it's already dry, re-wet the area and then add the green along the inner edge – it will softly blend into the yellow, creating a nice gradient.
Watch out! Try not to smudge wet paint with your hand (I’ve done it – more than once!).
Now… let it dry completely before moving on.
Step 3: Painting the seed and inner peel
For the seed, you’ll need two brown tones – one lighter, one darker to add depth and roundness.
Here are the mixes:
Light brown: Raw Umber + Transparent Sienna
Dark brown: Raw Umber + Transparent Sienna + Perylene Violet
Start with the lighter brown to fill in the entire seed area.
Since it's a small area, you can paint directly onto dry paper.
But if you prefer, dampen the area first with clean water.
To suggest roundness, deepen the bottom-right part of the seed with the darker brown.
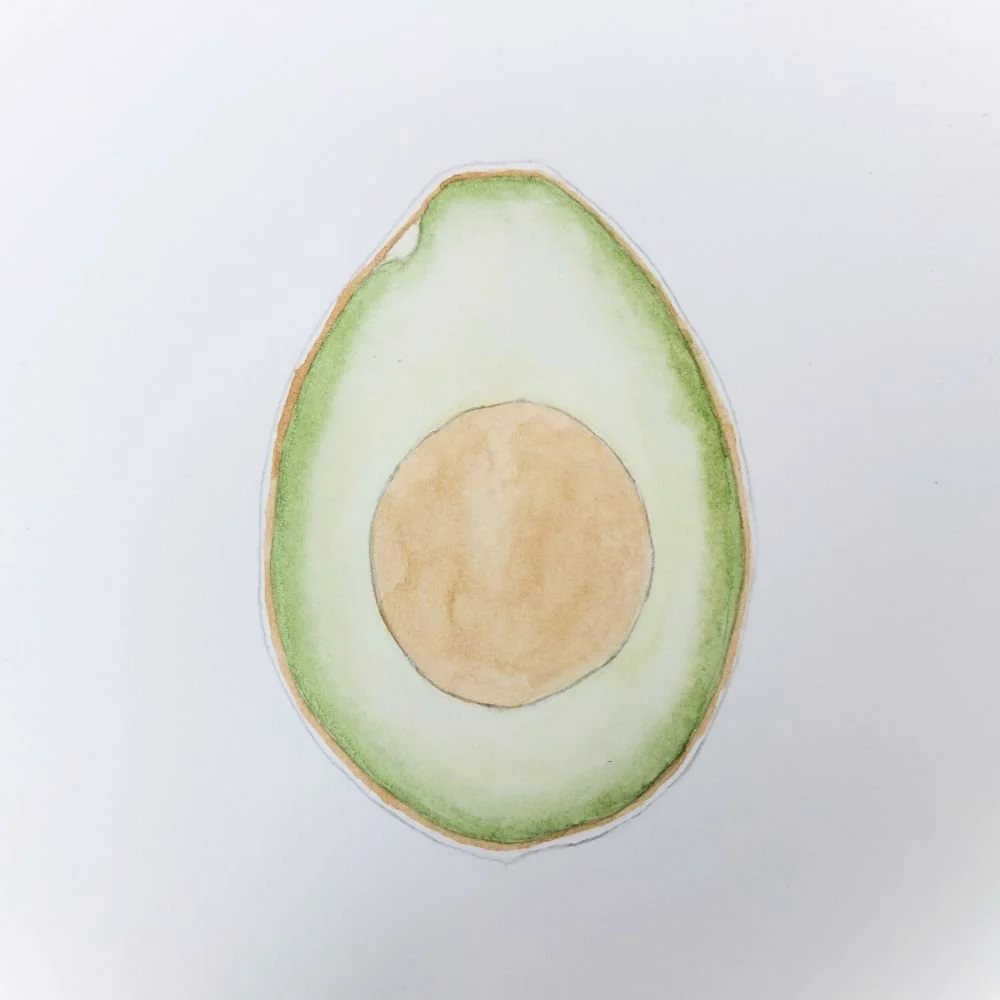
Second Layer - Seed and peel
Once that’s dry, use the same lighter brown to paint the inner part of the avocado peel.
This doesn’t need to be exact – we’ll refine the outer peel later with darker shades, which will help clean up any little mishaps.
Depicting the shadow of the seed
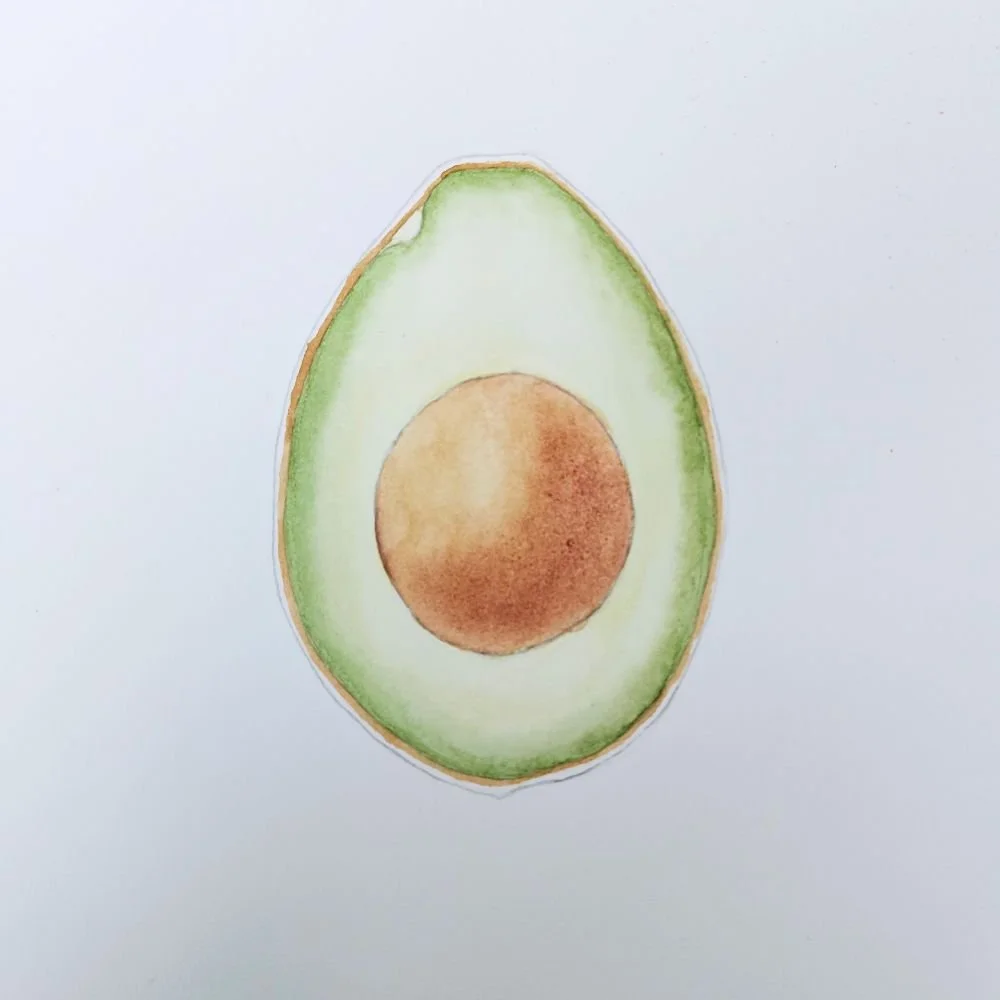
Step 4: Painting or drawing the outer peel
The avocado’s skin is dark and slightly rough – so don’t worry if your brush slips a bit.
I personally used the Dartana Spin brush and found it worked well, but feel free to use a smaller size if you’re more comfortable with it.
For the dark skin, I mixed Perylene Violet and Perylene Green from Winsor & Newton.
You’ll need a high pigment to water ratio to get that rich, dark tone.
You’re almost drawing with the paint here, since the mix is thick.
Alternatively, you can sketch the outer skin using a brown or black fineliner or colored pencil – this gives lovely texture and is a great beginner-friendly option.

Drawing in the Avocado peel
👉 Download the materials list & get started!
Step 5: Finishing Touches
Let’s wrap it up with some final details:
Use a stronger version of the creamy yellow to brighten the area around the seed.
Now’s a great time to draw the little notch at the top where the stem once was – I used the same brown from the seed and inner peel.
I also darkened the shadow side of the seed and intensified the green for more contrast.
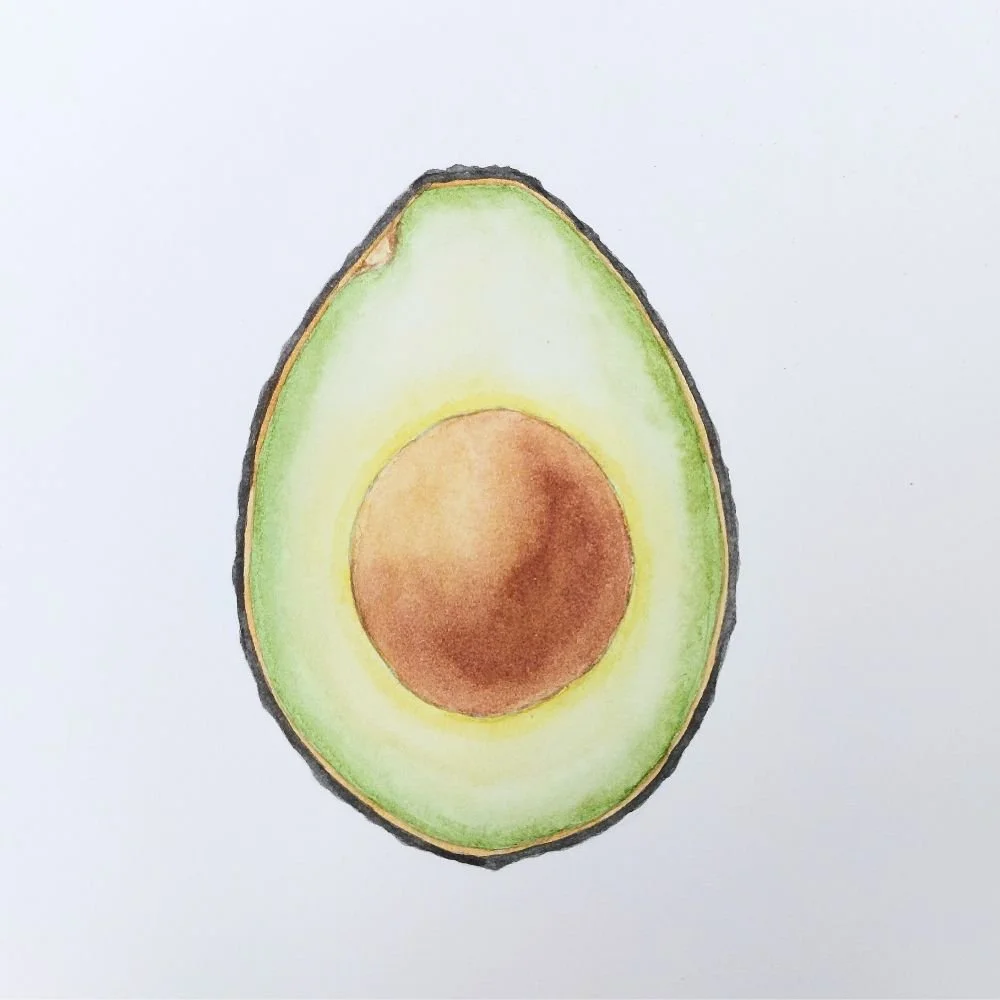
Finishing touches for the Avocado
Congratulations!
Well done – you’ve created your own avocado masterpiece!
To wrap it all up, here are a few fun ways to personalize your sketch:
Title/Header: Give your sketch a name and write it on the page using your brush.
You could even use the same green mix you used in the painting!
Notes: Did something stand out? Was anything tricky?
Did you wonder about something related to avocados? Jot it down beside your sketch.
Signature: Add your initials or name to the bottom right corner – make it yours!
Botanical SketchVibes is your little creative break – and with each painting, you’ll grow more confident in your sense of color and form.
Stick with it – more inspiration and plant-themed motifs are on the way soon!

The finished artwork!
Pin this tutorial on Pinterest!